


Windows 10 automatically downloads and installs updates as soon as they’re available, which is designed to keep your PC more secure but may become annoying if you’re trying to concentrate on something else at the time. Windows 10 Pro users can defer these updates by going to Settings, Update & Security, clicking ‘Advanced options’ and then ticking the ‘Defer upgrades’ box. There is also a free troubleshooting tool from Microsoft designed to let you temporarily uninstall updates that are causing system crashes or instability until a fix is available, which you can download from bit.ly/1i48Udj. Run this tool, select ‘Hide updates’ and Windows won’t install the unwanted updates until you tell it to.

Stop your PC sharing updates over the internet
Windows 10 has a built-in P2P-style system called Windows Update Delivery Optimization (WUDO), which shares Windows updates you’ve downloaded with other PCs over the internet. This benefits users on slower, less reliable connections, but if you’d rather not give up your internet bandwidth, you can disable the feature. Open Settings and click Update & Security. Click Windows Update and then click the ‘Advanced options’ link. Click ‘Choose how updates are delivered’. You can turn the feature off entirely, or restrict it to just PCs on your local network.

Stop Windows 10 sharing your Wi-Fi
Windows 10 introduces a new feature called Wi-Fi Sense (bit.ly/1LzQV8h), which lets you connect to open hotspots and wireless networks that have been shared by your friends, and share your own wireless network with Outlook.com contacts, Skype contacts and Facebook friends, without having to give them your actual Wi-Fi password. Sense restricts what people have access to, and despite some of the scare stories in the media, it’s rather useful and not really a privacy risk because your Wi-Fi details are encrypted. However, if you don’t like the idea of your Wi-Fi data being shared, it’s easily disabled. Go to Start, Settings, Network & Internet, Wi-Fi, Manage Wi-Fi settings and turn off the sharing features. You can also prevent the service from using your Wi-Fi by adding optout to the end of the box displaying the name of your wireless access point (the SSID).
 Stop Microsoft spying on you
You can adjust Windows 10’s privacy settings if you don’t want your data to be stored, shared or used without your permission. Click Start, type privacy settings, then hit Enter. Work your way through the settings using the categories on the left. For instance, you can choose which apps have access to your location, webcam and microphone. Windows 10 and Cortana want to ‘get to know you’, which sounds innocuous but actually involves collecting things like contacts, recent calendar events, speech and handwriting patterns, and typing history. This can be disabled entirely if you don’t like the idea.

Bypass the Windows 10 lock screen
By default, Microsoft forces you to log into Windows afresh each time you start up, either using a username and password, or a PIN. The latter is the speedier option of the two, but you can choose to skip the login stage altogether and boot directly to the Desktop. This obviously compromises your security a little, so might not be a good idea if there are nosy people in your house or office.
To make the change, click Start, type run, then click the Run option, type netplwiz and click OK (or press Window+R and do the same). Highlight your account and untick the option ‘Users must enter a username and password to use this computer’. Click Apply, then enter your password and confirm it. Click OK, restart your PC and you’ll be logged straight into Windows without needing to enter a password.
Manage your Windows 10 notifications
Windows 10’s new Action Centre displays all the notifications you receive from Windows and certain installed applications. If you feel you’re seeing too many, however, you can restrict both the types of notification you see, and the specific apps that are able to send them. Open the Action Centre by clicking on the notification icon in the System Tray. Click All Settings, System and Select ‘Notifications & actions’. You’ll see a list of Notifications categories, each of which can be toggled on or off. These include ‘Show me tips about Windows’, ‘Show app notifications’, ‘Show notifications on the lock screen’, and ‘Show alarms, reminders and incoming VoIP calls on the lock screen’. Below you’ll see which apps are able to send you notifications, and you can remove any you don’t want in the same way. You can additionally configure quick actions by clicking on notifications when they appear in the System Tray area.
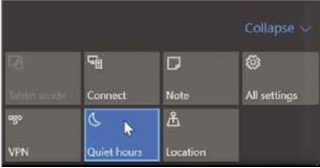
Use Quiet Hours to silence notifications
If your PC is on all the time, you probably won’t want it playing sounds in the middle of the night every time a new notification arrives. To stop this, click the notification icon in the System Tray, then select All Settings, System, then ‘Notifications & actions’. Browse the list of apps and make sure ‘Play a sound when a notification arrives’ is turned off for all items. To disable notifications altogether during the night, open the Action Centre in the System Tray and click the Quiet Hours button. Just make sure you turn the feature off again in the morning.
 Change your default browser
Microsoft’s new browser Edge is the default in Windows 10, but it’s arguably a bit lacking when compared to the likes of Chrome or Firefox. Fortunately, you don’t have to stick with Edge if you don’t want to. To change your default browser, open the Start menu, type default app settings and hit Enter. Click Web Browser, then select your preferred browser as the default.


Stop your PC sharing updates over the internet
Windows 10 has a built-in P2P-style system called Windows Update Delivery Optimization (WUDO), which shares Windows updates you’ve downloaded with other PCs over the internet. This benefits users on slower, less reliable connections, but if you’d rather not give up your internet bandwidth, you can disable the feature. Open Settings and click Update & Security. Click Windows Update and then click the ‘Advanced options’ link. Click ‘Choose how updates are delivered’. You can turn the feature off entirely, or restrict it to just PCs on your local network.

Stop Windows 10 sharing your Wi-Fi
Windows 10 introduces a new feature called Wi-Fi Sense (bit.ly/1LzQV8h), which lets you connect to open hotspots and wireless networks that have been shared by your friends, and share your own wireless network with Outlook.com contacts, Skype contacts and Facebook friends, without having to give them your actual Wi-Fi password. Sense restricts what people have access to, and despite some of the scare stories in the media, it’s rather useful and not really a privacy risk because your Wi-Fi details are encrypted. However, if you don’t like the idea of your Wi-Fi data being shared, it’s easily disabled. Go to Start, Settings, Network & Internet, Wi-Fi, Manage Wi-Fi settings and turn off the sharing features. You can also prevent the service from using your Wi-Fi by adding optout to the end of the box displaying the name of your wireless access point (the SSID).

You can adjust Windows 10’s privacy settings if you don’t want your data to be stored, shared or used without your permission. Click Start, type privacy settings, then hit Enter. Work your way through the settings using the categories on the left. For instance, you can choose which apps have access to your location, webcam and microphone. Windows 10 and Cortana want to ‘get to know you’, which sounds innocuous but actually involves collecting things like contacts, recent calendar events, speech and handwriting patterns, and typing history. This can be disabled entirely if you don’t like the idea.

Bypass the Windows 10 lock screen
By default, Microsoft forces you to log into Windows afresh each time you start up, either using a username and password, or a PIN. The latter is the speedier option of the two, but you can choose to skip the login stage altogether and boot directly to the Desktop. This obviously compromises your security a little, so might not be a good idea if there are nosy people in your house or office.
To make the change, click Start, type run, then click the Run option, type netplwiz and click OK (or press Window+R and do the same). Highlight your account and untick the option ‘Users must enter a username and password to use this computer’. Click Apply, then enter your password and confirm it. Click OK, restart your PC and you’ll be logged straight into Windows without needing to enter a password.
Manage your Windows 10 notifications
Windows 10’s new Action Centre displays all the notifications you receive from Windows and certain installed applications. If you feel you’re seeing too many, however, you can restrict both the types of notification you see, and the specific apps that are able to send them. Open the Action Centre by clicking on the notification icon in the System Tray. Click All Settings, System and Select ‘Notifications & actions’. You’ll see a list of Notifications categories, each of which can be toggled on or off. These include ‘Show me tips about Windows’, ‘Show app notifications’, ‘Show notifications on the lock screen’, and ‘Show alarms, reminders and incoming VoIP calls on the lock screen’. Below you’ll see which apps are able to send you notifications, and you can remove any you don’t want in the same way. You can additionally configure quick actions by clicking on notifications when they appear in the System Tray area.
Use Quiet Hours to silence notifications
If your PC is on all the time, you probably won’t want it playing sounds in the middle of the night every time a new notification arrives. To stop this, click the notification icon in the System Tray, then select All Settings, System, then ‘Notifications & actions’. Browse the list of apps and make sure ‘Play a sound when a notification arrives’ is turned off for all items. To disable notifications altogether during the night, open the Action Centre in the System Tray and click the Quiet Hours button. Just make sure you turn the feature off again in the morning.

Microsoft’s new browser Edge is the default in Windows 10, but it’s arguably a bit lacking when compared to the likes of Chrome or Firefox. Fortunately, you don’t have to stick with Edge if you don’t want to. To change your default browser, open the Start menu, type default app settings and hit Enter. Click Web Browser, then select your preferred browser as the default.


0 comentarios :
Post a Comment